Follow Me !
Easy Homemade Apple Slab Pie Best-Ever Recipe

Apple slab pie is the perfect dessert when you want all the cozy flavor of a classic apple pie with an easier, more generous shape. Tender pastry, warmly spiced apples, and a golden crust come together in a crowd-friendly treat that is ideal for holidays, potlucks, and relaxed family gatherings.
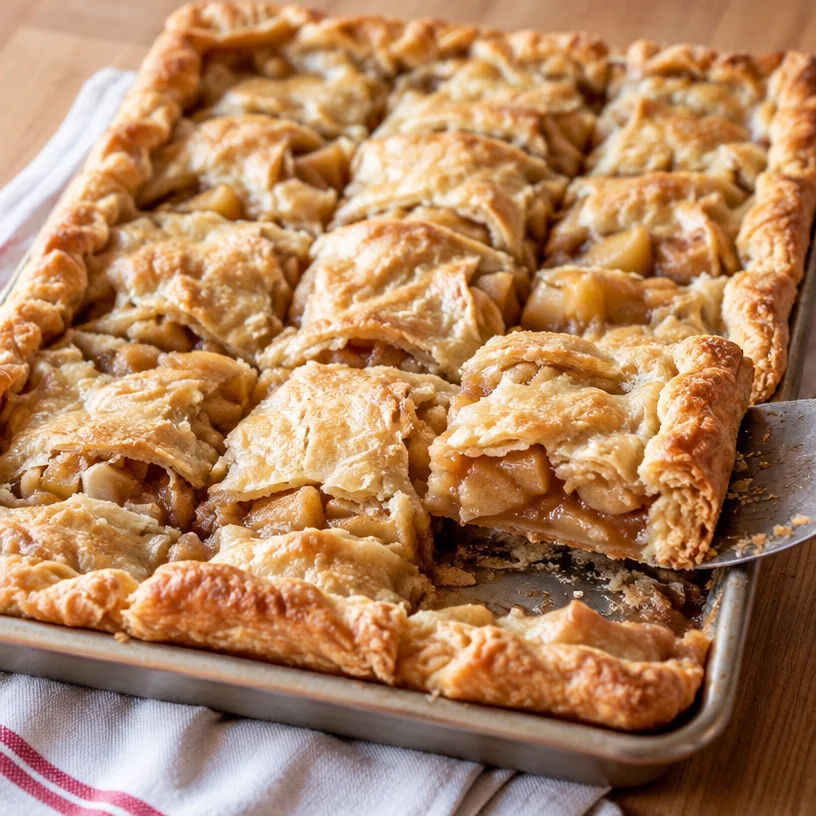
Why Make This Recipe
- Perfect for a crowd: A slab pie offers more servings than a traditional round pie, making it a smart choice for parties and celebrations.
- Classic comfort-food flavor: Sweet apples, fragrant spices, and buttery pastry create a dessert everyone recognizes and loves.
- Easy to serve: The rectangular shape makes it simple to cut into neat squares or bars.
- Flexible and forgiving: You can adjust the spices, choose your favorite apples, and finish the pie with glaze, icing, or a scoop of ice cream.
Ingredients
For the pastry and filling, gather:
- Pie crust dough, enough for the base and top of a rectangular baking pan
- Fresh apples, peeled, cored, and thinly sliced
- Granulated sugar
- Brown sugar
- All-purpose flour or cornstarch, to thicken the filling
- Ground cinnamon
- Ground nutmeg, optional
- A pinch of salt
- Fresh lemon juice
- Vanilla extract, optional
- Unsalted butter, cut into small pieces
- One egg, beaten with a splash of water or milk, for brushing the crust
Choose firm baking apples that hold their shape while cooking. A combination of sweet and tart apples gives the filling a more balanced flavor.
How to Make It
Prepare the pastry.
If using homemade dough, prepare it according to your recipe and chill it until firm but workable. Divide the dough into two portions, with one slightly larger portion for the bottom crust.Prepare the apples.
Peel, core, and thinly slice the apples. Toss them with lemon juice to help prevent browning.Season the filling.
Combine the apples with granulated sugar, brown sugar, flour or cornstarch, cinnamon, nutmeg if using, salt, and vanilla. Mix gently until the apples are evenly coated.Roll out the bottom crust.
Roll the larger portion of dough into a rectangle slightly larger than your baking pan. Carefully transfer it to the pan, pressing it gently into the bottom and corners. Leave a little overhang around the edges.Add the apples.
Spread the seasoned apples evenly over the crust. Distribute the pieces of butter over the top of the filling.Add the top crust.
Roll out the remaining dough and place it over the apples. Trim excess pastry, then pinch or crimp the edges to seal the pie. Cut several vents in the top crust so steam can escape.Brush and bake.
Brush the crust with the beaten egg mixture. Sprinkle with a little coarse sugar if desired. Bake in a preheated oven until the crust is deeply golden and the apple filling is bubbling around the edges.Cool before slicing.
Let the slab pie cool until the filling has time to set. Slice it into squares and serve warm or at room temperature.
How to Serve It
- Serve warm with vanilla ice cream, whipped cream, or a drizzle of salted caramel.
- Add a light powdered sugar glaze for a bakery-style finish.
- Pair each slice with coffee, tea, or spiced apple cider for a comforting dessert course.
How to Store It
Cover the cooled pie and store it at room temperature for up to one day, or refrigerate it for several days. Refrigeration helps preserve the apple filling and crust, especially in a warm kitchen.
For longer storage, wrap individual slices or the whole cooled pie tightly in plastic wrap and foil, then freeze. Thaw it in the refrigerator before reheating.
To restore the crust’s crisp texture, reheat slices in a 325°F oven until warmed through. Avoid relying only on the microwave, which can make the pastry soft, although short microwave bursts work well when convenience matters most.
Helpful Tips
- Use firm apples. Softer apples can release too much liquid and create a watery filling.
- Do not skip the vents. Openings in the top crust allow steam to escape and help keep the pastry crisp.
- Cool the pie before cutting. The filling thickens as it cools, making cleaner slices and preventing the juices from running out.
Optional Variations
- Add nuts: Stir chopped pecans or walnuts into the apple mixture for extra crunch.
- Change the spice blend: Add ground ginger, cardamom, or a little allspice alongside the cinnamon.
- Try a caramel finish: Drizzle cooled slices with caramel sauce or mix a small amount of caramel into the apple filling.
- Use a crumb topping: Replace the top pastry with a mixture of flour, oats, brown sugar, butter, and cinnamon for an apple crumble slab pie.
Frequently Asked Questions
Can I use store-bought pie crust?
Yes. Refrigerated pie dough is a convenient option and works well for both the bottom and top crust.
Which apples are best for slab pie?
Granny Smith, Honeycrisp, Braeburn, Pink Lady, and Jonathan apples are good choices. Combining tart and sweet varieties creates the best flavor.
Why is my apple pie filling watery?
Excess moisture can come from very juicy apples, overly thick slices, or insufficient thickener. Use firm apples, slice them evenly, and include flour or cornstarch in the filling.
Can I make this pie ahead of time?
Yes. You can bake it a day ahead and store it covered. Let it come to room temperature or gently reheat it before serving.
Can I freeze apple slab pie?
Yes. Cool it completely, wrap it tightly, and freeze it for up to several months. Thaw it in the refrigerator and reheat it in the oven for the best crust.
Apple Slab Pie
Apple slab pie is the perfect dessert for gatherings, combining the cozy flavors of classic apple pie in an easy-to-serve rectangular shape.
Ingredients
For the crust
- 1 batch Pie crust dough, enough for the base and top of a rectangular baking pan Homemade or store-bought
- 1 large Egg, beaten with a splash of water or milk, for brushing the crust
For the filling
- 6 cups Fresh apples, peeled, cored, and thinly sliced Choose firm baking apples
- 1 cup Granulated sugar
- 1/2 cup Brown sugar
- 1/4 cup All-purpose flour or cornstarch Used to thicken the filling
- 1 teaspoon Ground cinnamon
- 1/4 teaspoon Ground nutmeg Optional
- 1 pinch Salt
- 2 tablespoons Fresh lemon juice To prevent browning of apples
- 1 teaspoon Vanilla extract Optional
- 1/4 cup Unsalted butter, cut into small pieces To be distributed over the apples
Instructions
Preparation
- If using homemade dough, prepare it according to your recipe and chill until firm but workable. Divide the dough into two portions, with one slightly larger for the bottom crust.
- Peel, core, and thinly slice the apples. Toss with lemon juice.
Filling Preparation
- Combine the apples with granulated sugar, brown sugar, flour or cornstarch, cinnamon, nutmeg if using, salt, and vanilla. Mix gently.
Crust Assembly
- Roll the larger portion of dough into a rectangle slightly larger than your baking pan. Transfer it to the pan, pressing gently into corners.
- Spread seasoned apples evenly over the crust. Distribute pieces of butter over the top of the filling.
- Roll out the remaining dough and place it over the apples. Trim excess pastry, pinch edges to seal, and cut vents in the top crust.
Baking
- Brush the crust with the beaten egg mixture. Sprinkle with coarse sugar if desired. Bake in a preheated oven until crust is golden and filling is bubbling.
Cooling and Serving
- Let the pie cool until filling sets. Slice into squares and serve warm or at room temperature.
Notes
Serve warm with vanilla ice cream, whipped cream, or a drizzle of salted caramel. Cool the pie before cutting for cleaner slices.